- What is Pulsara HQ?
- How do I Find HQ?
- Call Status
- Navigating Pulsara HQ
- Notifications for New Patients
- Activating Teams
- Setting Door Time, Reg #, and Room Number
- Filtering and Sorting Patients
- Searching Patients
- Show the Chief Complaint

What is Pulsara HQ?
Pulsara HQ is a centralized area to view and edit patient status and details. Pre-registration, triage, team activation, patient messaging, and more can be performed using a desktop web browser.
How do I Find HQ?
Hospital users can find the shortcut to HQ in the Pulsara MANAGER menu if they are a member of a team with the "This team can use Pulsara HQ" privilege.

If you have access to more than one facility in Pulsara, review How to Access Multiple Facilities in HQ.
Call Status
Setting your call status in Pulsara HQ will allow you to receive patient alerts on your computer. See Browser Alerting for instructions on how to set up alerts.
The My Call Status Window will appear on every login.
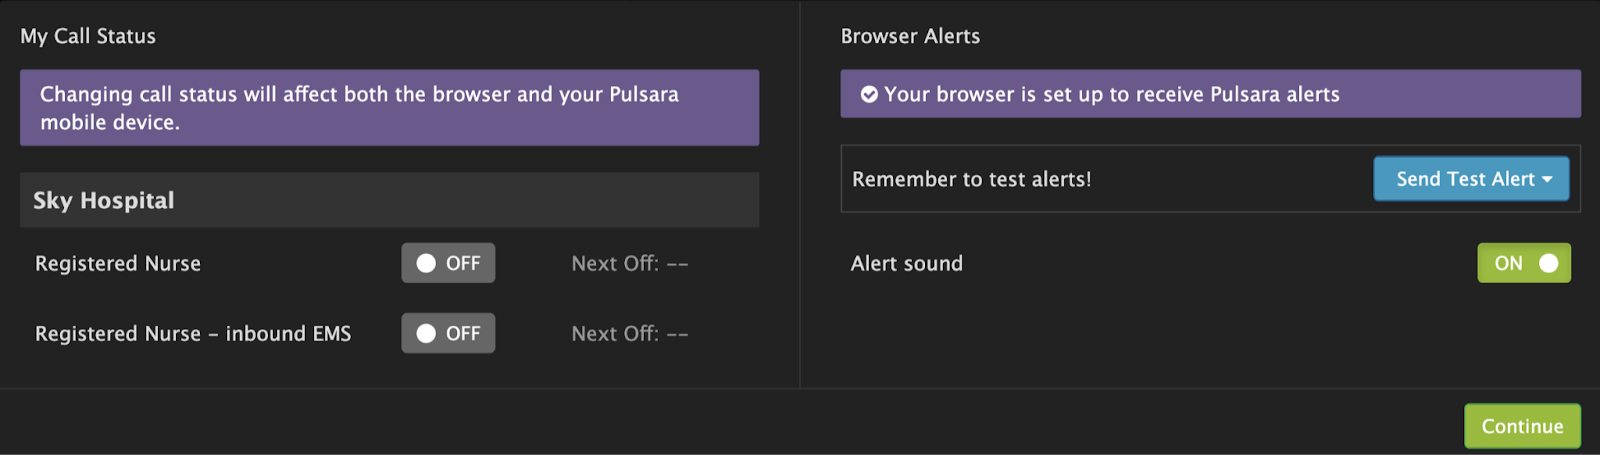
The My Call Status Window allows users to toggle their call status as well as schedule their next off-call.
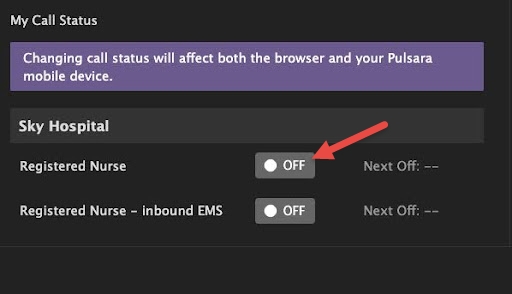
Click on the OFF button next to a team to go on call for that team. The OFF button will change to a green ON to indicate you are on call for a team.
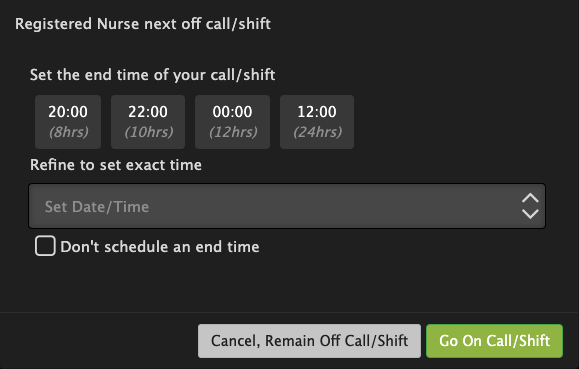
When toggling On-Call, you will be asked to schedule off call/end shift time.
NOTE: It is possible to go on call without setting a shift end time by selecting “Don’t schedule an end time.” However, this is not recommended, as it requires you to remember to manually take yourself off call at the end of your shift.
You'll have the option to choose from a handy selection of common shift durations, or manually set the time your shift will end using the 'Set Date/Time' field underneath.
After you finish setting your end time, click “Go On Call/Shift” to begin receiving patient alerts.
NOTE: When logging out of Pulsara, there is no need to toggle off call given you already scheduled that to occur automatically.
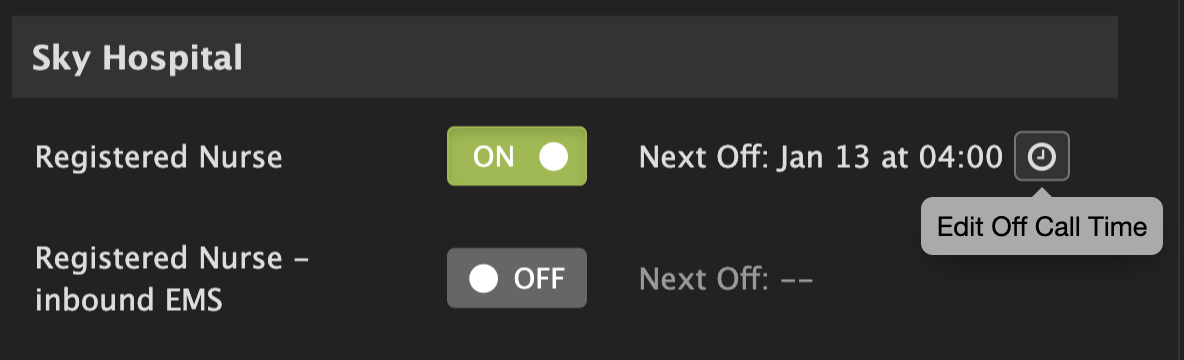
NOTE: If a scheduled next-off time was selected, the scheduled time will appear in the My Call Status screen next to the team name. The next-off time can be edited by clicking the clock icon.
Click on Continue to return to your current work in HQ.
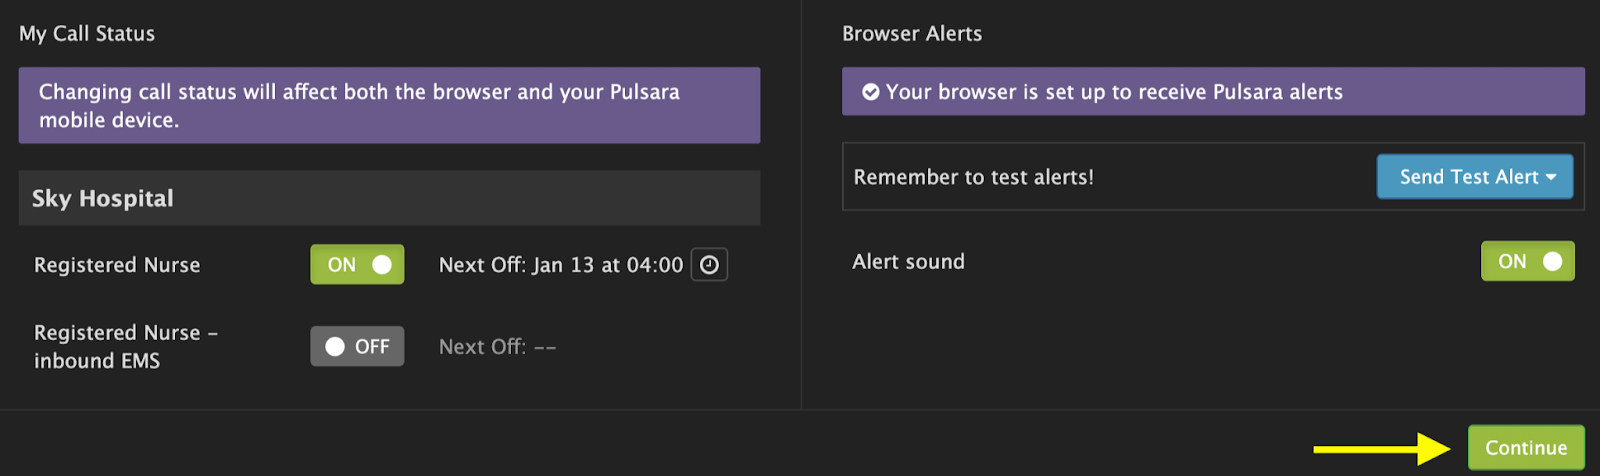
Going on-call in Pulsara HQ will also place you on call within the MOBILE app if you have previously logged into the MOBILE app. Your call status will remain unchanged when logging out of HQ unless an end time has been scheduled. We highly encourage users to send themselves a Test Alert at the start of every shift.
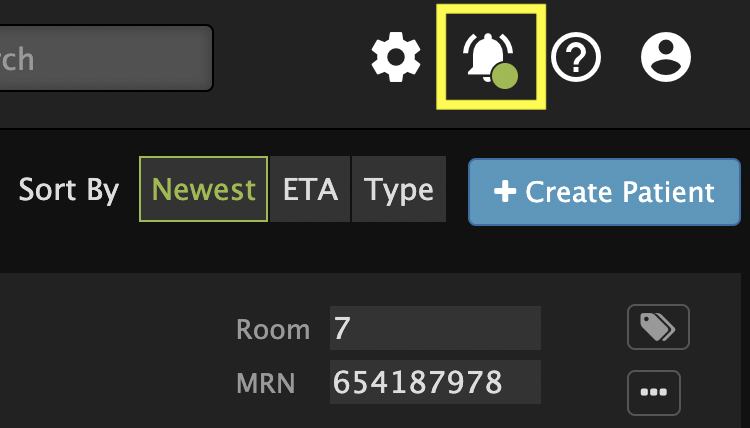
If at any time during your shift you need to view or edit call status information in Pulsara, click the bell notification in the upper right corner of the screen.
Navigating Pulsara HQ
Pulsara HQ includes patient filtering, sorting, and details all from one screen. This guide will provide an overview of the major components of the patient dashboard.
At a glance, the patient type, MOA, ETA, and statuses can be seen for each patient.

The view patient button on each patient row contains the full details for a single patient (demographics, images, audio clips, etc.)

Notifications for New Patients
When a patient is assigned to the logged-in HQ user account, an alert and a new row will appear in HQ. The new patient row will flash red until it is clicked.
The logged in user is assigned to a patient in one of two ways:
- A new patient is created and one of the teams you are on call for is alerted. For example, if you are on call for a team that is alerted about incoming EMS patients, and EMS creates a patient for your facility, HQ will display an alert and a new red flashing row for the patient.
- When the current HQ user is off call, but is explicitly assigned to the patient via the Update Team screen.

Acknowledging a New Patient Alert
To acknowledge a new patient alert, click on the red flashing row. This action lets the care team know you are aware of the patient and updates the Team screen so that you show with a green check mark next to your name.
Acknowledgement of EMS remains a separate action in HQ. To send an acknowledgement to EMS, click on the red ambulance icon.

The ambulance button turns green once it has been clicked to indicate that you have communicated that your hospital knows EMS is delivering the patient.

If you see a message that acknowledgment cannot be sent to EMS, please ensure you are on call for the team that allows EMS acknowledgment.
Activating Facility Teams
To activate facility teams for new patients, click on the red checkmark on the desired patient row. The checkmark will turn green when the teams are activated.

Setting Door Time, Reg #, and Room Number
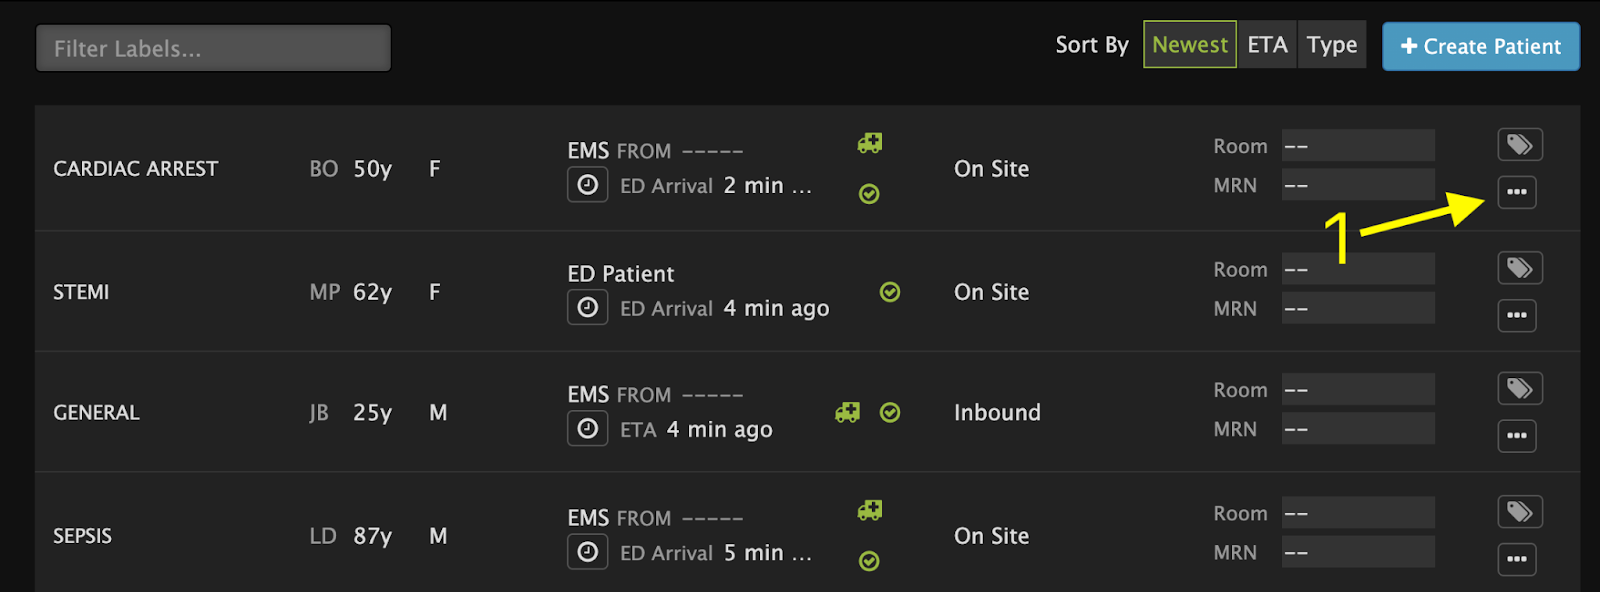
Set door time for your team by clicking on the clock icon in the patient row. Enter the door time in the menu that appears. Capturing this metric is critical for both the patient’s journey at your facility and also to utilize the full power of Pulsara.


Click on the empty area next to the Room or Reg # to enter this data for your patient. Press enter or click the checkmark to save these fields.

Filtering and Sorting Patients
Patients can be filtered by Case Type, Status, MOA, or Consults and Transfers.

Filters can be mixed and matched to find the exact results of the patients you need. Only patients that match all active filters will be shown in the dashboard.

Use the ‘clear’ option next to any filter to remove it.
If incoming patients are hidden by your active filters, a number will appear next to the patient rows indicating the number of hidden patients. To view these hidden patients, click the number.

If your job role calls for managing inbound EMS patients, the MOA: EMS filter can help to keep your dashboard view to only the patient(s) you need to see.
Collapse filters by clicking the filter category name to focus on the filters that are most important to you and reserve screen space for the most used filters. Click the category name again to reveal the filter options.

Sort patients by ETA, Type, and Newest using the options in the upper right.
Note: new patients sorted by creation time will appear at the top of the list by default.

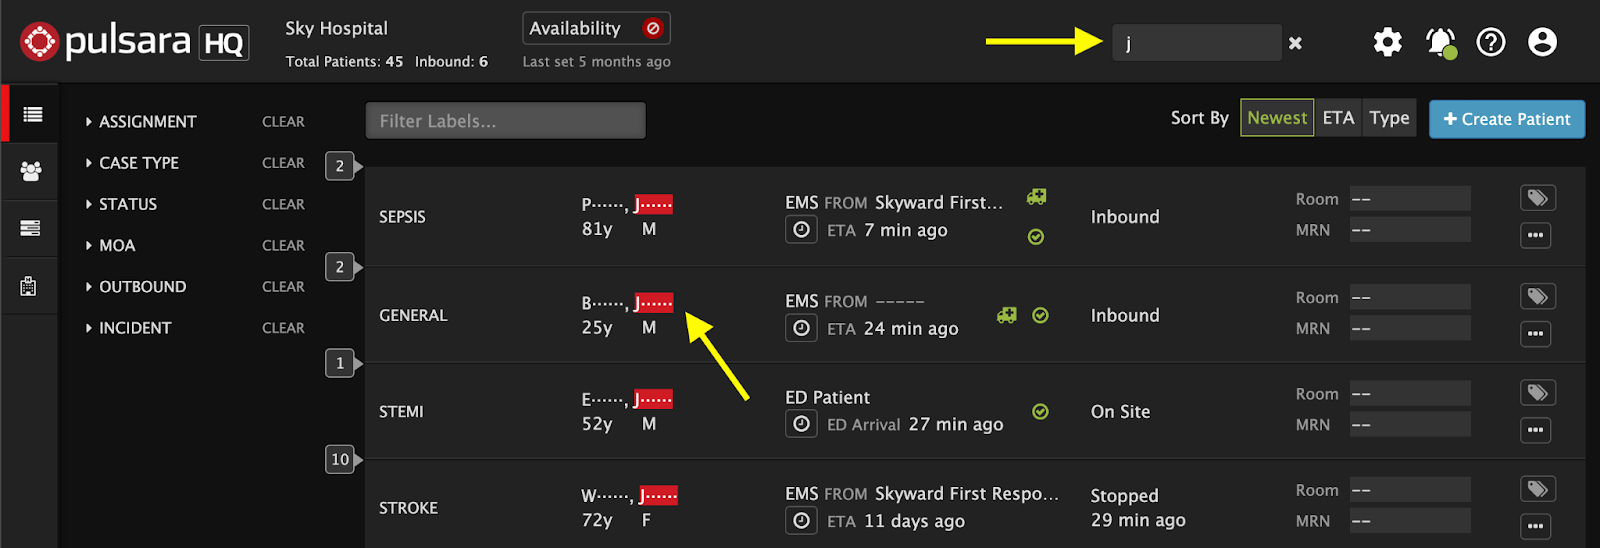
Searching Patients
Search for patients by Patient Name, Age, Chief Complaint, or organization. Searching covers inbound and outbound entity names to find specific organizations delivering or receiving patients.
Display patient full names by clicking on the gear icon below the search bar. Select “Show Patient Names”.
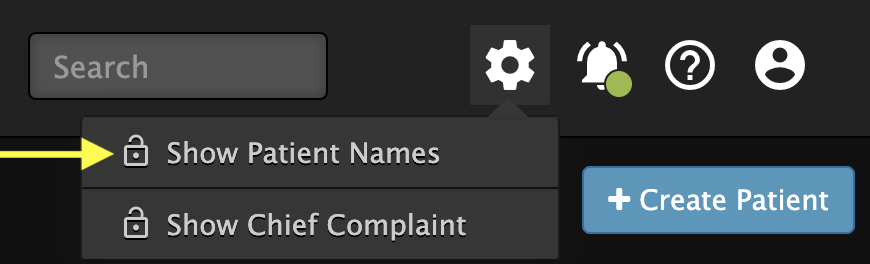
Choose ‘Show Names” the prompt that appears.

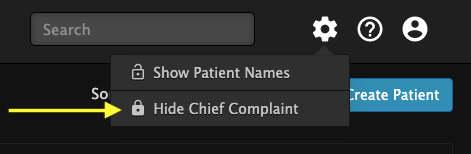
Show the Chief Complaint
The Chief Complaint will by default display in the HQ Patient List. Up to 17 characters will display in the list. To view the entire Chief Complaint, mouse over the field in the list, or click to view it in the Patient Details panel.

Disabled the Chief Complaint display by clicking on the Gear icon in the upper right and choosing Hide Chief Complaint from the menu.
To edit, simply click on the field in the patient list or click Edit when viewing the details panel.